AutoSPInstaller is one of great project that facilitate Automated SharePoint installation. Though SharePoint is a great Product every body agrees it is not applying to SharePoint Product Configuration Wizard, Isn't it?
Earlier I have difficulties when I'm working with AutoSPInstaller because of it’s XML file. But with the AutoSPInstallerGUI it is amazing..!
I'm Going to illustrate How to install three tier SP Farm with Medium Security and automatically provisioned some necessary services using AutoSPInstaller.
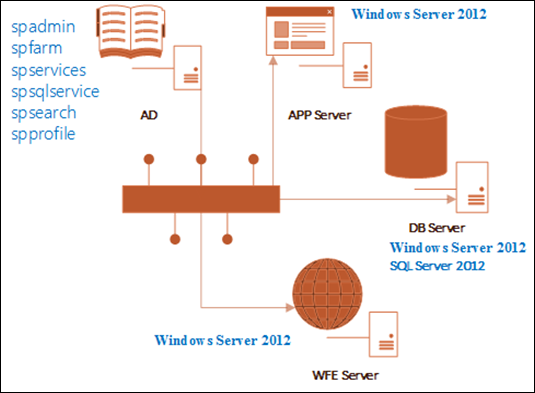
My Deployment Layout
You cab refer minimum and recommended requirements in here http://technet.microsoft.com/en-us/library/cc262485.aspx
For the medium security you need following service accounts created in AD
Setting Up AD ACCOUNTS (These accounts need to be created in Active Directory)
| User | Task | Machine Rights | SQL DB Rights | Doman Rights |
| spadmin | Use for set up and Configuration | Local Admin All Servers (DB,WFE,APP) | SQL DB Creator and Security Admin Rights | User |
| spfarm | sp timer service , Central Admin Application Pool, Other Configurations | User | ||
| spservices | Service and Pool account user | User | ||
| spsqlservice | Run services in SQL Server (MSSQLSERVER, SQLSERVERAGENT) | User | ||
| spsearch | SP search service , crawlers , search related | User | ||
| spprofile | user profile synchronization account | Need Replicating Directory Changes |
Note: Add Replicate Directory Changes to User
This is quite easy. First you need to go to run dsa.msc in Run Windows or open Active Directory Users and Computers.
Then Right click the domain and click delegate control.
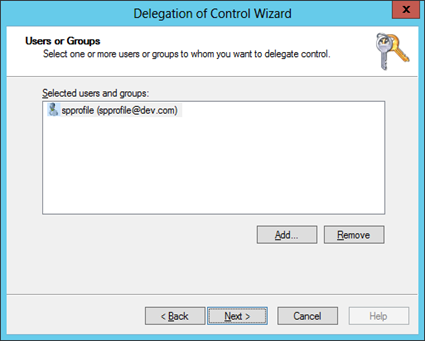
Then click next and select spprofile user.
Then Click next and Select Custom Task Delagate and click next.
Then select This folder, Existing objects in this folder, and creation of new objects in this folder and click next.
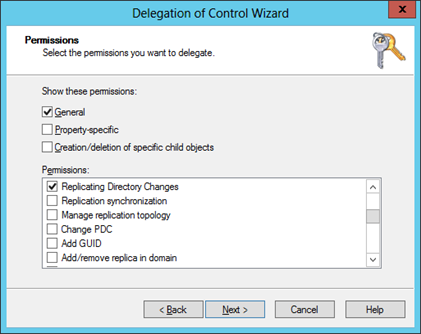
In here select Replicating Directory Changes and Proceed to finish the wizard.
Setting Up DB Server (Login as spadmin)
I installed Windows Server 2012 in the DB server. After installing OS you need to install the SQL server. Following are the steps you need to perform additionally.
In the feature selection you can select Database Services and Management Tools – Basic , Management Tools – Complete , Other than these features you can select other related ones if needed.
Then You can add spadmin as a Admistrator for management.
And you should add spsqlservice as service accounts running credentials for MSSQLSERVER, SQLSERVERAGENT.
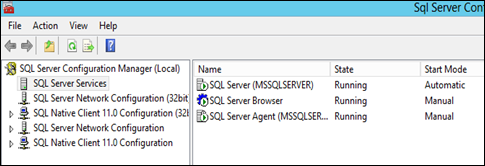
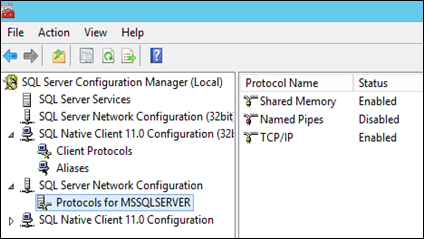
Then complete the installation and Enable TCP/IP , and start the SQL browser in SQL configuration management.
Getting Ready with AutoSPInstaller
Then Extract AutoSPInstaller to a suitable location (Assume C:\). Now you have following folder structure
AutoSPInstaller can be run either in Offline mode or Online Mode. In Offline mode you need Prerequisites files. First we will prepare SharePoint 2010 installation.
Prepare SharePoint 2010 Environment
- Download SharePoint 2010 Prerequisites – There are available power shell scripts that will automatically download prerequisites. (link1 , link2)
- When you are done put prerequisites files inside PrerequisitesInstallerFiles (SP->2010->SharePoint->PrerequisitesInstallerFiles)
- Then Download PDF Filter and Download PDF Icon.
- Then put PDF filter installation and PDF icon inside the PDF folder (SP->2010->SharePoint->PDF)( PDF filter download as a zip file. You need extract it and put it in the folder )
- Then Open your SharePoint 2010 installation (CD or folder) and copy it to SharePoint Folder. (SP->2010->SharePoint)
Prepare SharePoint 2013 Environment
- Download SharePoint 2013 Prerequisites
- When you are done put prerequisites files inside PrerequisitesInstallerFiles (SP->2013->SharePoint->PrerequisitesInstallerFiles)
- Then Download PDF Filter and Download PDF Icon.
- Then put PDF filter installation and PDF icon inside the PDF folder (SP->2013->SharePoint->PDF)( PDF filter download as a zip file. You need extract it and put it in the folder )
- Then Open your SharePoint 2013 installation (CD or folder) and copy it to SharePoint Folder. (SP->2013->SharePoint)
Initial Server (Login as spadmin) [ We added this user as a Local Admin ] Set Up
APP Server , WFE Server
- OS : Windows Server 2012
If you are installing SharePoint 2013; You need to install .NET Framework 3.5 to the server.
Ref : http://www.danielclasson.com/install-net-framework-35-server-2012/
DB Server
- OS : Windows Server 2012
- SQL Server 2012
after setting up initial servers you need to configure you service accounts in the installation. For that extract the AutoSPInstallerGUI. Then open the AutoSPInstallerInput.XML (inside the AutoSPInstaller) using the AutoSPInstallerGUI.Exe
After opening the file we need to configure .
Here we already have prerequisites thus you can select Offline Install. And You can select either 2010 or 2013.
Then go the second tab
- Specify the farm account
- We need to enter manage accounts and passwords here (spsearch , spprofile , spservices)
- Here we need to enter cache account since we do not have created account for it we can user spservices account. Or you can create a spcache domain account and add it in here (we normally do it for full security installation)
- You need to put DBserver Machine name here (Fully qualified name)
- This is central admin DB name you can put any readable name.
- This is config DB name. You can put any sensible name.
- Optionally you can configure Email and logs.
- Here we need to specify web applications we need. There are two web apps defined in default. Portal and Myhost. By selecting those from dropdown you can specify name , pool name , urls and port.
- Here you need to specify app pool account name (so we have spservices, so use it)
- Here you need to specify SharePoint admin user (spadmin)
Third tab has service applications configuration. Most of services work with default configuration. We need to specially configure User Profile and Search service.
- Sync account is the account use for AD synchronization. Therefore add spprofile account.
- Here we need to specify Database names for profile,Sync and Social
- here select the Search Service account (spsearch)
- We need to specify the spsearch account here
- We need to select spsearch account here.
Now save the file. Now You are ready.
Installing Servers
You need to copy the entire folder structure to app, wfe. (SP Folder with all sub folders) then run the SPAutoInstallerLaunch
Note: AutoSpinstaller make all the server as WFE servers. If you need to make a server as a App server turn off SharePoint Foundation web service




Comments